Table of Contents
What is Seq2Seq?
Deep learning models have achieved human level accuracy in a lot of tasks. These models are able to map input to the output with excellent accuracy and with less effort. But one of the challenges is to achieve human level accuracy to map one sequence to another. This is usually seen in language translation or speech translation and it is known as machine translation.
In machine translation it is very crucial that the deep learning model yields results in the correct order in a sequence. One of the biggest challenges in translating a sentence from one language to another, let’s say from English to French, is that the output sequence could differ from the input sequence in terms of the length of sentence or words, or even the order of words.
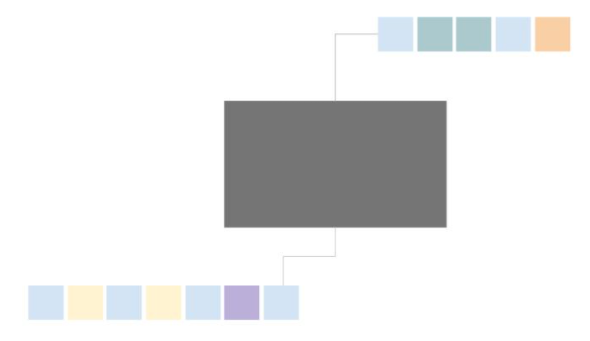
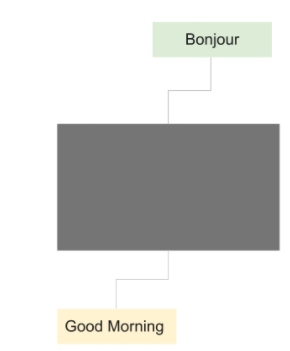
For example, Good morning in French will be Bonjour. A sentence with length of two in one language has a length of one in another language. This was a general problem in the early neural translation model where the model has to yield translation from one arbitrary length to another arbitrary length.
To solve this problem Sutskever, et al. in 2014 developed an architecture called sequence to sequence or Seq2Seq. This architecture has two main components: an encoder and a decoder. The authors in their paper named “Sequence to Sequence Learning with Neural Networks” proposed a method to use a multilayer LSTM to map the input sequence of an arbitrary length to a fixed sized vector, and then use another LSTM to decode the target sequence from the fixed sized vector.
The algorithm showed some promising results in tasks like machine translation, text summarization, and image captioning. As a matter of fact Google translate began using Seq2Seq in production in late 2016.
How does Seq2Seq model work
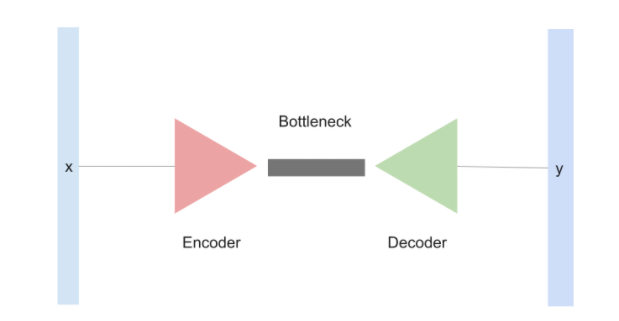
The seq2seq model is an architecture based on the multiple LSTM network or sometimes a GRU. Under the hood the model comprises two main components: encoder and decoder. These components are responsible for summarizing the information into fixed length vectors through a bottleneck and then predict the target words from that fixed length vector.
The encoder-decoder architecture was introduced in the computer vision task for image generation. The bottleneck of the model is where the real magic happens. The information that is fed into the model is squeezed to a vector of desired length and this squeezed vector in the bottleneck stores important information that the decoder uses to predict the output. Often this vector is called the latent vector.
Encoder
The encoder of the network takes in the input sequence one element at a time and produces a vector called the context vector. This context vector aims to preserve the vital information for all the elements in the input sequence so that the decoder can make accurate predictions.
As new information or words are sequentially fed into the encoder, the context vector is updated.

Decoder
The decoder of the network takes in the final context from the encoder into the first layer of the network and starts predicting the target or the output sequences one element at a time.

Types of Seq2Seq model
There are two types of Seq2Seq model:
- Original or Vanilla Seq2Seq model
- Attention based Seq2Seq model
Original or Vanilla Seq2Seq mode
The original Seq2Seq that was proposed by Sutskever, et al. mentioned the use of multiple LSTMs as their base architecture which was used for both encoder and decoder. But in fact you can use RNNs, LSTMs or even GRUs. To get a better understanding of what happens in a Seq2Seq model we will use RNNs.
RNNs in general have a very simple architecture. It takes two inputs: an input word from sequence and a context vector or hidden from the previous input.

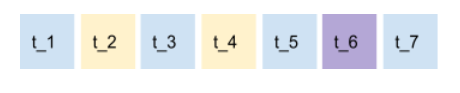
The diagram above shows a sequence of data. It can be any data: text, audio, time series, , and so on. . Each of the elements of the sequence can be represented in an order, let’s say t_n, where n is the total number of elements in that sequence, see the image below.
In an RNN, each element is fed one at a time such that it outputs a context vector also known as the hidden state as well as the output.
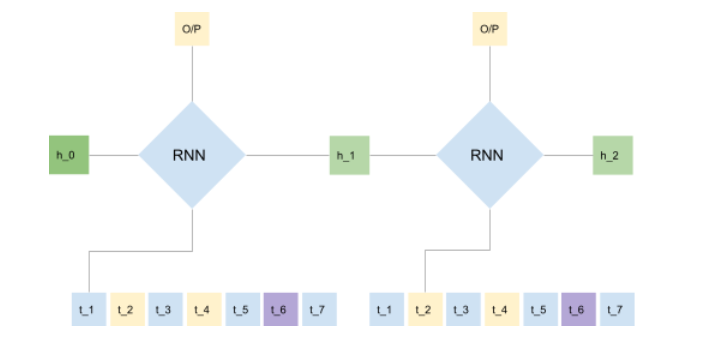
With each new sequence that is fed into it, the RNN keeps producing a new hidden state and an output. In the Seq2Seq model we are not concerned about the output at all. All we are concerned about is the hidden states (the first hidden state is initialised as zero).
The RNN encoder takes all the input sequences and yields a final hidden state. This hidden state acts as a bottleneck where all the representations are extracted from all the sequences.
The decoder, which is also an RNN based network, takes the final context vector as the first hidden state,predicts an output, and then uses that same output to predict the next output.
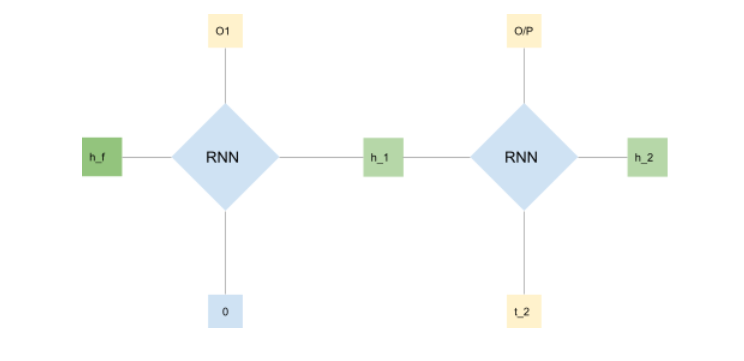
The image above shows the flowchart of the decoder. As you can see the final hidden output is passed as the initial hidden state for the decoder’s RNN. Along with the hidden state you also need to pass an initial input so that the decoder yields an output. Essentially the RNN yields two outputs: first is the generated output and a hidden state. Both of the output is used to predict the next element in the sequence along with the hidden state.
Attention based Seq2Seq model
The attention based Seq2Seq model is a bit complicated. Let’s divide this section into 3 parts: hidden state, the attention mechanism and the context vector.
Hidden state
Unlike the original Seq2Seq model where we had only one final hidden state from the encoder, here in attention based Seq2Seq we produce multiple hidden states corresponding to each element in the sequence. This allows more information to be stored in the context vector.
The attention mechanism
Since we are considering all the hidden states from each input element we need a special context vector that not only captures important information from those hidden states but also removes unnecessary information. In other words, we want our model to focus on the important features and representations.
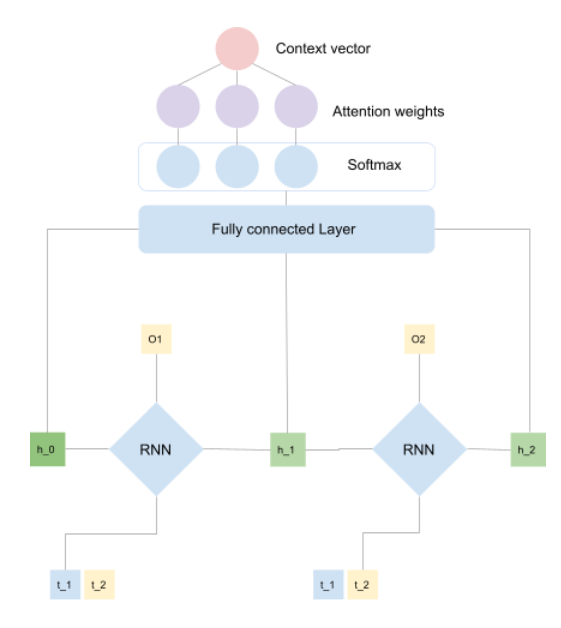
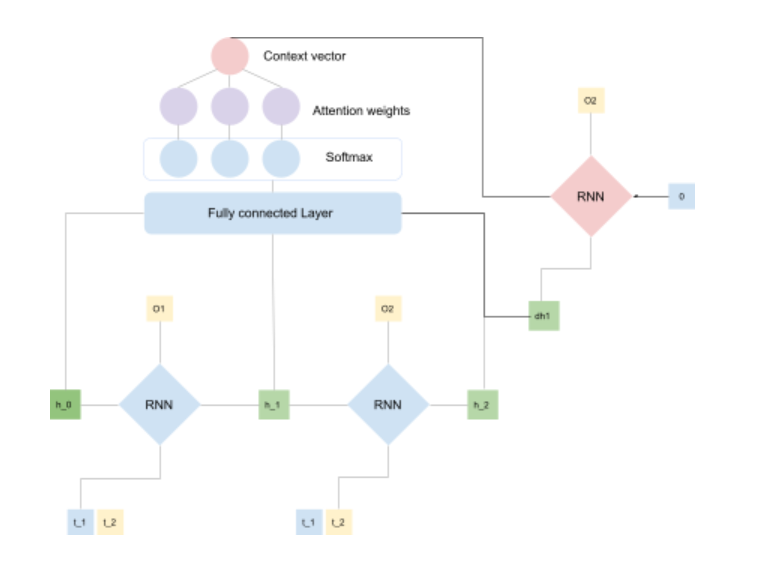
The image above shows how we can get the context vector based on the attention mechanism. All the hidden states are fed into a linear layer. The output of the linear layer depends upon the number of hidden state vectors fed into it. These outputs from the linear layer are passed through the softmax function which essentially assigns important vectors with probability closer to 1 and vectors which aren’t important are assigned values closer to zero.
Finally we calculate the context vector by performing a matrix multiplication between the encoder hidden state and attention weights.
Context vector
In the attention-based Seq2Seq model, the context vector becomes the initial state of the decoder. But unlike the basic Seq2Seq model, every hidden state that the decoder produces is fed back to the fully connected layer to produce a new context vector. This makes the context vector of the attention based Seq2Seq model dynamic and flexible compared to the basic Seq2Seq model, which is fixed.
Challenges of Sequence Modelling
Sequence modelling in general refers to the use of mathematical notions to model a given sequence. The fact that elements in the sequences are order-dependent make them harder to model. The purpose of any mathematical approach (including deep learning) is to model or learn any given sequence such that it captures three important properties of the sequence:
- Context – Order of the sequence
- Variability – The elements of the sequence can repeat
- Length – Potentially infinity
If a certain model is able to capture these three properties then it could pass the Turing’s test.
Various models have been built over the years. Initially sequence modeling started by defining how probable a function can be to predict a word. Later conditional probability was introduced followed by modeling sequences with neural networks.
The RNNs could effectively solve the second property(variability), but it still had to cover two more properties. With the introduction of LSTM and GRU, the third property was covered as they could have long-term dependencies.
But the first property was still required to build a good language model. With the introduction of the attention mechanism, NLP models started to capture contextual information. However this was not sufficient.
These challenges led the NLP community to come up with new techniques such as transfer learning, where you can use a pretrained model and repurpose it as a starting point for other types of learning problems. . For example, the bidirectional LSTM network is applied to other problems of contextual learning. But it was a work-around method.
With the introduction of transformers and parallel training, new and powerful models started to emerge. All these models had encoder-decoder inspired architectures derived from the Seq2Seq model. These models needed more data compared to what the previous models required. And with the increase in data, the requirement of computing power also increased drastically.
Although larger organisations like Openai and Deepmind make the code and configuration of the models open to the public so that they can use it for their own needs. but potential threats that come with these models are concerning.
The state of the art models that are trained on a large corpus of internet data have a lot of offensive language regarding race or gender that can lead to undesired results when they are applied in production. Efforts are being made to regularize the use of such models so as not to disadvantage any race, culture, religion or gender.
Basic Seq2Seq model vs. Seq2Seq model with Attention
Earlier we saw how the attention based Seq2Seq model is much more flexible than the basic Seq2Seq model. To elaborate more on the differences between the two we have to understand the working of both the models.
The basic Seq2Seq model produces only one context, that is, the final hidden state from all the elements of the sequence. This restricts the model from accessing more information from the given sequence. Imagine if the sequence has 50 elements or even 100 elements, then the context vector will eventually fail to capture the information from the earlier elements. This will lead to context loss. Therefore the model will not be able predict elements that correspond to a given context.
With an attention based mechanism, the context vector gets information from all the hidden states which is further processed to get attention score. This score is used to highlight information, or hidden state, that is important to make a prediction. Furthermore, at each prediction, the produced hidden state is fed back into the context vector. Including additional hidden states strengthens context and provides long term dependencies. This key difference that the model gets from the attention mechanism makes it flexible and dynamic compared to being a static fixed sized vector.
When to use the Seq2Seq model?
The Seq2Seq model is very handy in tasks that require sequence generation. If you want to model sequences that can be used for tasks like language translation, image captioning, text summarization, or question-answering, then the Seq2Seq algorithm is a strong choice.
But if you are looking to generate long sentences or even paragraphs then you should probably consider using models like GPT2 and GPT3. The reason is, even though the Seq2Seq model can perform fairly well in tasks having long sequences because it can preserve long term dependencies, it fails to preserve contextual information.
Also, Seq2Seq was not designed for text classification. If you are interested in text classification which includes sentiment analysis, then you should probably look into ULMFiT and BERT. On the other hand, the transformer based model excels in all the tasks that Seq2Seq excels in including preserving contextual information.
Key concepts of Seq2Seq model
When starting your journey with Seq2Seq models, you should make yourself familiar with certain NLP models. These models came before Seq2Seq models and can help you to firm your understanding about sequence modeling in general.
To begin with you should know about:
- Sequence modeling
- How to model sequences using conditional probability
- N-grams
- Context vectorizing
- Neural Network Language Model
- Word2Vec
- Recurrent neural networks
- Backpropagation through time (BPTT)
- Problems occurring with BPTT
- Vanishing gradients
- Exploding gradients
- Bidirectional RNN
- LSTM
- GRU
All the above topics can help you before you can jump into models like Seq2Seq, ELMo, ULMFiT, Transformers, BERT, GPT1, GPT2, and GPT3. One good thing about NLP is that every new architecture improves the existing model.
Seq2Seq model examples:
This section will cover frameworks and tools that can be used to build a Seq2Seq model followed by the implementation of the same. The implementation process will be demonstrated with Pytorch, Keras and Tensorflow.
Seq2Seq model frameworks & Tools
Deep learning frameworks and library:
- Pytorch
- Keras
- Tensorflow
- Transformer by Huggingface
- Spacy
Libraries to fetch data:
- Sklearn
- Tensorflow Text
Seq2Seq Model using Pytorch (Example)
In this section we will learn how to implement the Seq2Seq model from scratch. We will be using the pytorch framework to implement Seq2Seq followed by Keras and Tensorflow.
Data Loading and preparation
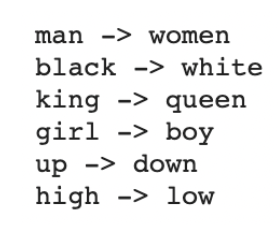
For easier understanding, we will make a simple dataset which will contain pair words, one being the opposite of the other. Our aim will be to build a model that can predict the opposite pair when provided with a word.
seq_data = [['man', 'women'], ['black', 'white'], ['king', 'queen'], ['girl', 'boy'], ['up', 'down'], ['high', 'low']]
Once we are ready with the data we can start preparing the data. Whenever we deal with NLP tasks it is important that we create a vocabulary. A vocabulary is the set of letters in a given document, data or sequence. We also have to consider special tokens that will help the model during training. We will be creating 3 tokens ‘S’ for start, ‘E’ for end, and ‘P’ for padding.
After creating the vocabulary we will transform each word in the sequence into numbers.
					char_arr = [c for c in 'SEPabcdefghijklmnopqrstuvwxyz']
num_dic = {n: i for i, n in enumerate(char_arr)}
Once preprocessing is done we will make batches for training. The input sequence that will be fed into the encoder should be one hot encode.
The output sequence which is the input for the decoder should also be one hot encoded and it should also have an ‘S’ token assigned before every word, as this will signal the decoder to start decoding.
Note: Just like the encoder, the decoder takes two inputs, an original sequence and a hidden state, and yields two outputs, generated output and a hidden state. In this model we will not use the previous output to predict a new output instead we will use the decoder’s input.
The ground truth will not be one hot encoded, as this makes it easier to calculate the loss.
					def make_batch():
 input_batch, output_batch, target_batch = [], [], []

 for seq in seq_data:
   for i in range(2):
       seq[i] = seq[i] + 'P' * (n_step - len(seq[i]))

   input = [num_dic[n] for n in seq[0]]
   output = [num_dic[n] for n in ('S' + seq[1])]
   target = [num_dic[n] for n in (seq[1] + 'E')]

   input_batch.append(np.eye(n_class)[input])
   output_batch.append(np.eye(n_class)[output])
   target_batch.append(target) # not one-hot

 # make tensor
 return torch.FloatTensor(input_batch), torch.FloatTensor(output_batch), torch.LongTensor(target_batch)
Implementing Seq2Seq model
Implementing the Seq2Seq is pretty straight forward. We use the nn.RNN function to create an RNN cell that takes three parameters: input size, hidden size, and drop out. Both the encoder and the decoder will have the same settings.
We will also use a linear layer to make the final prediction.
How the model works:
- The encoder takes the input and initial hidden state i.e. zero vector and yields predicted output and the hidden state or context vector.
- The context vector is then fed into the decoder along with the decoder inputs.
- The decoder yields predicted outputs and hidden states.
- We then pass the predicted output through the linear layer.
					class Seq2Seq(nn.Module):
 def __init__(self):
   super(Seq2Seq, self).__init__()

   self.enc_cell = nn.RNN(input_size=n_class, hidden_size=n_hidden, dropout=0.5)
   self.dec_cell = nn.RNN(input_size=n_class, hidden_size=n_hidden, dropout=0.5)
   self.fc = nn.Linear(n_hidden, n_class)

 def forward(self, enc_input, enc_hidden, dec_input):
   enc_input = enc_input.transpose(0, 1) # enc_input: [max_len(=n_step, time step), batch_size, n_class]
   dec_input = dec_input.transpose(0, 1) # dec_input: [max_len(=n_step, time step), batch_size, n_class]

   # enc_states : [num_layers(=1) * num_directions(=1), batch_size, n_hidden]
   _, enc_states = self.enc_cell(enc_input, enc_hidden)
   # outputs : [max_len+1(=6), batch_size, num_directions(=1) * n_hidden(=128)]
   outputs, _ = self.dec_cell(dec_input, enc_states)

   model = self.fc(outputs) # model : [max_len+1(=6), batch_size, n_class]
   return model
Calling the model.
model = Seq2Seq()
Training the Seq2Seq model
Before starting the training we should define the loss function and the optimizer. The loss we should define is a combination of softmax function and negative log likelihood loss (i.e. cross entropy loss).
The optimizer that we will be using is the Adam optimizer.
					criterion = nn.CrossEntropyLoss()
optimizer = torch.optim.Adam(model.parameters(), lr=0.001)

input_batch, output_batch, target_batch = make_batch()
Once the loss and the optimizer are defined we can start the training.
					for epoch in range(5000):
   # make hidden shape [num_layers * num_directions, batch_size, n_hidden]
   hidden = torch.zeros(1, batch_size, n_hidden)

   optimizer.zero_grad()
   # input_batch : [batch_size, max_len(=n_step, time step), n_class]
   # output_batch : [batch_size, max_len+1(=n_step, time step) (becase of 'S' or 'E'), n_class]
   # target_batch : [batch_size, max_len+1(=n_step, time step)], not one-hot
   output = model(input_batch, hidden, output_batch)
   # output : [max_len+1, batch_size, n_class]
   output = output.transpose(0, 1) # [batch_size, max_len+1(=6), n_class]
   loss = 0
   for i in range(0, len(target_batch)):
       # output[i] : [max_len+1, n_class, target_batch[i] : max_len+1]
       loss += criterion(output[i], target_batch[i])
   if (epoch + 1) % 1000 == 0:
       print('Epoch:', '%04d' % (epoch + 1), 'cost =', '{:.6f}'.format(loss))
   loss.backward()
   optimizer.step()
Inference with Seq2Seq
After the training is completed we will perform an inference on the trained model to check whether the output it yields is correct and satisfactory.
					input_batch, output_batch, _ = make_batch()

# make hidden shape [num_layers * num_directions, batch_size, n_hidden]
hidden = torch.zeros(1, 6, 128)
for i in range(0, len(input_batch)):
 output = model(input_batch, hidden, output_batch)
 # output : [max_len+1(=6), batch_size(=1), n_class]

 output = output.transpose(0, 1)
 output = torch.argmax(output.data, -1)[i].numpy()

 decode = [char_arr[c] for c in output]

 end = decode.index('E')
 translated = ''.join(decode[:end])

 input_word = [char_arr[w] for w in input_batch[i].max(-1)[1]]
 input_word = ''.join(input_word[:end])
 print(f"{input_word.replace('P', '')} -> {translated.replace('P', '')}")
Seq2Seq Model using Keras (Example)
Let’s implement Seq2Seq with LSTM using Keras. We will build a Seq2Seq model that will translate English into French. The dataset can be downloaded from here, or you can run the following command in your notebook:
!wget https://raw.githubusercontent.com/devm2024/nmt_Keras/master/fra.txt
First things first we will import the libraries.
					import pandas as pd
import numpy as np
import string
from string import digits

%matplotlib inline
import re

from Keras.layers import Input, LSTM, Embedding, Dense
from Keras.models import Model
Loading and data preprocessing
After downloading the data from the given url, we can use the pandas library to read and load it.
lines= pd.read_table('fra.txt', names=['eng', 'fr'])
lines = lines[:100]
For preprocessing, we should make sure that all unnecessary expressions should be removed or at least reduced. Some of which are:
- Lowering casing the whole document
- Removing punctuation marks
- Removing unnecessary spaces
- Removing numbers
- Assigning start and end tokens
def preprocess():
lines.eng=lines.eng.apply(lambda x: x.lower())
lines.fr=lines.fr.apply(lambda x: x.lower())
lines.eng=lines.eng.apply(lambda x: re.sub("'", '', x)).apply(lambda x: re.sub(",", ' COMMA', x))
lines.fr=lines.fr.apply(lambda x: re.sub("'", '', x)).apply(lambda x: re.sub(",", ' COMMA', x))
exclude = set(string.punctuation)
lines.eng=lines.eng.apply(lambda x: ''.join(ch for ch in x if ch not in exclude))
lines.fr=lines.fr.apply(lambda x: ''.join(ch for ch in x if ch not in exclude))
remove_digits = str.maketrans('', '', digits)
lines.eng=lines.eng.apply(lambda x: x.translate(remove_digits))
lines.fr=lines.fr.apply(lambda x: x.translate(remove_digits))
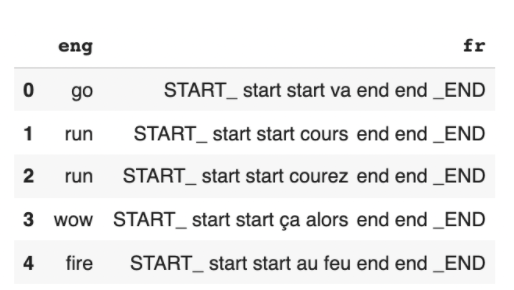
lines.fr = lines.fr.apply(lambda x : 'START_ '+ x + ' _END')
preprocess()
print(lines.head())
After preprocessing we will create vocabulary for both english and french followed by transforming letters into numbers.
					all_eng_words=set()
for eng in lines.eng:
   for word in eng.split():
       if word not in all_eng_words:
           all_eng_words.add(word)

all_french_words=set()
for fr in lines.fr:
   for word in fr.split():
       if word not in all_french_words:
           all_french_words.add(word)

input_words = sorted(list(all_eng_words))
target_words = sorted(list(all_french_words))
num_encoder_tokens = len(all_eng_words)
num_decoder_tokens = len(all_french_words)

input_token_index = dict(
   [(word, i) for i, word in enumerate(input_words)])
target_token_index = dict(
   [(word, i) for i, word in enumerate(target_words)])
Creating one hot encoding for the encoder’s and the decoder’s input, and the target variables.
					encoder_input_data = np.zeros((len(lines.eng), 7),dtype='float32')
decoder_input_data = np.zeros((len(lines.fr), 16),dtype='float32')
decoder_target_data = np.zeros((len(lines.fr), 16, num_decoder_tokens), dtype='float32')
Implementing Seq2Seq model
Here we will implement word embedding as well. This will create a look-up table which will also optimize itself using backpropagation. Word embedding or the look-up table is a vector representation of the input sequence. Word embedding makes learning efficient. We will define its size as 50, meaning that each word will have 50 vectorized representations.
embedding_size = 50
Working of the model:
- The input sequence is passed into the embedding layer.
- The output from the embedding layers is fed into the encoder. Since the encoder is the LSTM cell it will output: cell state, hidden state and the generated output.
- The cell state and hidden state are then fed into the decoder, which is also a LSTM based network, along with the decoder input.
- Since we only care about the predicted output from the decoder we will then pass that output into the fully connected layer.
					encoder_inputs = Input(shape=(None,))
en_x=  Embedding(num_encoder_tokens, embedding_size)(encoder_inputs)
encoder = LSTM(50, return_state=True)
encoder_outputs, state_h, state_c = encoder(en_x)
# We discard `encoder_outputs` and only keep the states.
encoder_states = [state_h, state_c]

decoder_inputs = Input(shape=(None,))
dex=  Embedding(num_decoder_tokens, embedding_size)
final_dex= dex(decoder_inputs)

decoder_lstm = LSTM(50, return_sequences=True, return_state=True)
decoder_outputs, _, _ = decoder_lstm(final_dex, initial_state=encoder_states)
decoder_dense = Dense(num_decoder_tokens, activation='softmax')
decoder_outputs = decoder_dense(decoder_outputs)
Training the model
For training we will use the model API from Keras. The model API will organize the functions we defined earlier in a sequential manner.
Once the model is defined we can compile the model with an Adam optimizer and cross entropy loss like we did in the pytorch version. After compiling we can start the training using the .fit method.
					model = Model([encoder_inputs, decoder_inputs], decoder_outputs)

model.compile(optimizer= ‘adam’, loss='categorical_crossentropy', metrics=['acc'])

model.fit([encoder_input_data, decoder_input_data], decoder_target_data,
         batch_size=128,
         epochs=10,
         validation_split=0.05)
Inference
Once the training is completed we can perform inference on the trained model.
					encoder_model = Model(encoder_inputs, encoder_states)
decoder_state_input_h = Input(shape=(50,))
decoder_state_input_c = Input(shape=(50,))
decoder_states_inputs = [decoder_state_input_h, decoder_state_input_c]

final_dex2= dex(decoder_inputs)

decoder_outputs2, state_h2, state_c2 = decoder_lstm(final_dex2, initial_state=decoder_states_inputs)
decoder_states2 = [state_h2, state_c2]
decoder_outputs2 = decoder_dense(decoder_outputs2)
decoder_model = Model(
   [decoder_inputs] + decoder_states_inputs,
   [decoder_outputs2] + decoder_states2
For inference we should Reverse-lookup token index to decode sequences back to something readable.
					reverse_input_char_index = dict(
   (i, char) for char, i in input_token_index.items())
reverse_target_char_index = dict(
   (i, char) for char, i in target_token_index.items())
					def decode_sequence(input_seq):
   # Encode the input as state vectors.
   states_value = encoder_model.predict(input_seq)
					  # Generate empty target sequence of length 1.
   target_seq = np.zeros((1,1))
   # Populate the first character of target sequence with the start character.
   target_seq[0, 0] = target_token_index['START_']

   # Sampling loop for a batch of sequences
   # (to simplify, here we assume a batch of size 1).
   stop_condition = False
   decoded_sentence = ''
   while not stop_condition:
       output_tokens, h, c = decoder_model.predict(
           [target_seq] + states_value)

       # Sample a token
       sampled_token_index = np.argmax(output_tokens[0, -1, :])
       sampled_char = reverse_target_char_index[sampled_token_index]
       decoded_sentence += ' '+sampled_char

       # Exit condition: either hit max length
       # or find stop character.
       if (sampled_char == '_END' or
          len(decoded_sentence) > 52):
           stop_condition = True

       # Update the target sequence (of length 1).
       target_seq = np.zeros((1,1))
       target_seq[0, 0] = sampled_token_index

       # Update states
       states_value = [h, c]

   return decoded_sentence
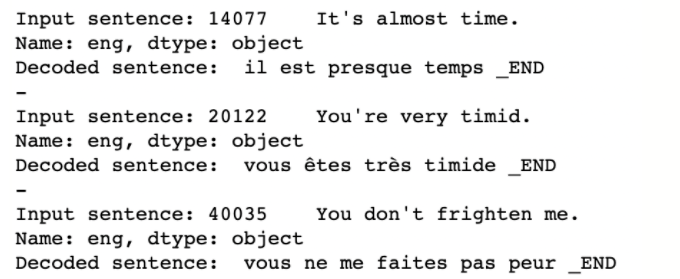
					for seq_index in [99,2,45,40]:
   input_seq = encoder_input_data[seq_index: seq_index + 1]
   decoded_sentence = decode_sequence(input_seq)
   print('-')
   print('Input sentence:', lines.eng[seq_index: seq_index + 1])
   print('Decoded sentence:', decoded_sentence)
Seq2Seq Model using TensorFlow
In this section we will use Tensorflow to implement the Seq2Seq model, but here we will use GRU with the attention mechanism. To begin with we will pip install tensorflow_text, this will allow us to perform data preprocessing with format required by the tensorflow framework. The aim is to translate spanish into English.
!pip install tensorflow_text
					import numpy as np

import typing
from typing import Any, Tuple

import tensorflow as tf
from tensorflow.Keras.layers import Embedding, GRU, Layer
from tensorflow.Keras.layers.experimental import preprocessing
from tensorflow.python.ops import math_ops

import tensorflow_text as tf_text
Download the file:
					import pathlib

path_to_zip = tf.Keras.utils.get_file(
   'spa-eng.zip', origin='http://storage.googleapis.com/download.tensorflow.org/data/spa-eng.zip',
   extract=True)

path_to_file = pathlib.Path(path_to_zip).parent/'spa-eng/spa.txt'
Loading and data preprocessing
Next we will prepare input and output data.
					def load_data(path):
 text = path_to_file.read_text(encoding='utf-8')

 lines = text.splitlines()
 pairs = [line.split('\t') for line in lines]

 inp = [inp for targ, inp in pairs]
 targ = [targ for targ, inp in pairs]

 return targ, inp
					targ, inp = load_data(path_to_file)
print(inp[-1])
print(targ[-1])
					Output::

Si quieres sonar como un hablante nativo, debes estar dispuesto a practicar diciendo la misma frase una y otra vez de la misma manera en que un músico de banjo practica el mismo fraseo una y otra vez hasta que lo puedan tocar correctamente y en el tiempo esperado.

If you want to sound like a native speaker, you must be willing to practice saying the same sentence over and over in the same way that banjo players practice the same phrase over and over until they can play it correctly and at the desired tempo.
					BUFFER_SIZE = len(inp)
BATCH_SIZE = 64

dataset = tf.data.Dataset.from_tensor_slices((inp, targ)).shuffle(BUFFER_SIZE)
dataset = dataset.batch(BATCH_SIZE)


def tf_lower_and_split_punct(text):
 # Split accecented characters.
 text = tf_text.normalize_utf8(text, 'NFKD')
 text = tf.strings.lower(text)
 # Keep space, a to z, and select punctuation.
 text = tf.strings.regex_replace(text, '[^ a-z.?!,¿]', '')
 # Add spaces around punctuation.
 text = tf.strings.regex_replace(text, '[.?!,¿]', r' \0 ')
 # Strip whitespace.
 text = tf.strings.strip(text)

 text = tf.strings.join(['[START]', text, '[END]'], separator=' ')
 return text
					max_vocab_size = 400

input_text_processor = preprocessing.TextVectorization(
   standardize=tf_lower_and_split_punct,
   max_tokens=max_vocab_size)

input_text_processor.adapt(inp)

# Here are the first 10 words from the vocabulary:
print(input_text_processor.get_vocabulary()[:10])
['', '[UNK]', '[START]', '[END]', '.', 'que', 'de', 'el', 'a', 'no']
					output_text_processor = preprocessing.TextVectorization(
   standardize=tf_lower_and_split_punct,
   max_tokens=max_vocab_size)
Implementing the Seq2Seq model
					class Encoder(Layer):
 def __init__(self, input_vocab_size, embedding_dim, enc_units):
   super(Encoder, self).__init__()
   self.enc_units = enc_units
   self.input_lang_embedding = Embedding(input_vocab_size, embedding_dim)
   self.gru = GRU(self.enc_units,
                                  # Return the sequence and state
                                  return_sequences=True,
                                  return_state=True,
                                  recurrent_initializer='glorot_uniform')

 def call(self, word_indices, state=None):
   word_embeddings =  self.input_lang_embedding(word_indices)
   whole_sequence_output, final_state = self.gru(word_embeddings)
   return whole_sequence_output, final_state
Implementing the Attention Mechanism
					class BahdanauAttention(tf.Keras.layers.Layer):
 def __init__(self, units):
     super().__init__()
     self.W1 = tf.Keras.layers.Dense(units, use_bias=False)
     self.W2 = tf.Keras.layers.Dense(units, use_bias=False)

 def call(self, query, keys, mask):
     query_weights = tf.expand_dims(self.W1(query), 2)
     keys_weights = tf.expand_dims(self.W2(keys), 1)
     score = tf.reduce_sum(tf.nn.tanh(query_weights + keys_weights), -1)
     padding_mask = tf.expand_dims(math_ops.logical_not(mask), 1)
     score -= 1e9 * math_ops.cast(padding_mask, dtype=score.dtype)
     attention_scores = tf.expand_dims(tf.nn.softmax(score, axis=2), -1)
     context = tf.reduce_sum(attention_scores * tf.expand_dims(keys, axis=1), axis=2)
     return context, attention_scores,
					class Decoder(tf.Keras.layers.Layer):
 def __init__(self, output_vocab_size, embedding_dim, dec_units):
   super(Decoder, self).__init__()
   self.english_embedding = Embedding(output_vocab_size, embedding_dim)
   self.gru = GRU(dec_units, return_sequences=True, return_state=True)
   self.dense = tf.Keras.layers.Dense(output_vocab_size)
   self.attention = BahdanauAttention(dec_units)

 def call(self, input_word_indices, encoder_keys, mask, state=None):
   embedding_ = self.english_embedding(input_word_indices)
   output, state = self.gru(embedding_, initial_state=state)
   context, attention_scores = self.attention(query=output,
                                             keys=encoder_keys,
                                             mask = mask)
   concat = tf.concat([output, context], axis=-1)


   vocab_output = self.dense(concat)

   return vocab_output, state
					class ModelTrain(tf.Keras.Model):
 def __init__(self, input_text_processor, output_text_processor, embedding_dim, units):
   super(ModelTrain, self).__init__()
   self.encoder = Encoder(input_text_processor.vocabulary_size(), embedding_dim, units)
   self.decoder = Decoder(output_text_processor.vocabulary_size(), embedding_dim, units)
   self.input_text_processor = input_text_processor
   self.output_text_processor = output_text_processor

 @tf.function
 def train_step(self, data):
   input_sentence, output_sentence = data
   input_word_indices = self.input_text_processor(input_sentence)
   output_word_indices = self.output_text_processor(output_sentence)
   output_mask = tf.cast(output_word_indices != 0, tf.float32)

   with tf.GradientTape() as tape:
     whole_encoder_states, final_hidden_state = self.encoder(input_word_indices)
     vocab_output, decoder_last_state = self.decoder(input_word_indices=output_word_indices,
                                                     encoder_keys = whole_encoder_states,
                                                     mask = (input_word_indices != 0),
                                                     state=final_hidden_state )

     loss = tf.reduce_sum(self.loss(y_true=output_word_indices[:, 1:], y_pred=vocab_output[:, :-1]) * output_mask[:, 1:])
   variables = self.trainable_variables
   gradients = tape.gradient(loss, variables)
   self.optimizer.apply_gradients(zip(gradients, variables))
   return {'loss': loss}
Training the model
					model = ModelTrain(input_text_processor, output_text_processor, 300, 128)

model.compile(
   optimizer=tf.optimizers.Adam(),
   loss=tf.Keras.losses.SparseCategoricalCrossentropy(
       from_logits=True, reduction='none')
)
model.fit(dataset, epochs=2)
Inference
					class Infer(tf.Module):
 def __init__(self,encoder, decoder,
              input_text_processor,
              output_text_processor):
   self.encoder = encoder
   self.decoder = decoder
   self.input_text_processor = input_text_processor
   self.output_text_processor = output_text_processor

   self.idx_to_word = (
       tf.Keras.layers.experimental.preprocessing.StringLookup(
           vocabulary=output_text_processor.get_vocabulary(),
           invert=True))

   # The output should never generate padding, unknown, or start.
   index_from_string = tf.Keras.layers.experimental.preprocessing.StringLookup(
     vocabulary=output_text_processor.get_vocabulary())

   token_mask_ids = index_from_string(['',
                                   '[UNK]',
                                   '[START]']).numpy()

   token_mask = np.zeros([index_from_string.vocabulary_size()], dtype=np.bool)
   token_mask[np.array(token_mask_ids)] = True
   self.token_mask = token_mask[tf.newaxis, tf.newaxis, :]


   self.start_token = index_from_string('[START]')
   self.end_token = index_from_string('[END]')

 def tokens_to_text(self, result_tokens):
   result_text_tokens = self.idx_to_word(result_tokens)

   result_text = tf.strings.reduce_join(result_text_tokens,
                                       axis=1, separator=' ')

   result_text = tf.strings.strip(result_text)
   return result_text

 def sample(self, logits):
   logits = tf.where(self.token_mask, -np.inf, logits)
   return tf.argmax(logits, axis=-1)

 def translate(self, input_sentence, max_length=50,):
   batch_size = tf.shape(input_sentence)[0]
   input_word_indices = self.input_text_processor(input_sentence)
   input_mask = (input_word_indices != 0)
   whole_encoder_output, final_hidden_state = self.encoder(input_word_indices)
   dec_state = final_hidden_state
   vocab_input = tf.fill([batch_size, 1], self.start_token)
   result_tokens = []
   done = tf.zeros([batch_size, 1], dtype=tf.bool)
   for current_length in range(max_length):
     vocab_output, dec_state = self.decoder(input_word_indices=vocab_input,
                                            encoder_keys=whole_encoder_output,
                                            mask= input_mask, state= dec_state)
     vocab_input = self.sample(vocab_output)


     done = done | (vocab_input == self.end_token)
     vocab_input = tf.where(done, tf.constant(0, dtype=tf.int64), vocab_input)
     result_tokens.append(vocab_input)

     if tf.reduce_all(done):
       break

   result_tokens = tf.concat(result_tokens, axis=-1)
   result_text = self.tokens_to_text(result_tokens)
   return {'text': result_text}
infer = Infer(model.encoder, model.decoder, input_text_processor, output_text_processor)
print(infer.translate(["Te quiero.", "mi pasaporte esta aqui", "¿Dónde está el hotel?", "Quiero irme a casa hoy.", "La tierra gira alrededor del sol."])['text'].numpy())
					array([b'i want you .', b'my passport is here .', b'where is the hotel ?',
       b'i want to go home today .', b'the earth was around the sun .'],
      dtype=object)
Real-life applications of Seq2Seq model
In the real world the Seq2Seq model has been widely used. As mentioned in the beginning of the post, Google uses the Seq2Seq model for all its translations.
The Seq2Seq model is widely used in chatbots and speech recognition softwares as well. In fact, Baidu’s Deep voice uses the same architecture to clone voices. You can check out the sample in this link.
The Seq2Seq model can also be used for:
- Text summarization
- Text compression
- Document summarization
- Paraphrase generation
- Text generation
- Stock or Crypto market prediction
- Time series analysis
- Demand forecasting
- Medical science
- Protein sequencing
- DNA sequencing
- Materials sequencing
Best practices
Let’s discuss some of the best practices for the Seq2Seq model. In general these practices will also be relevant for most NLP tasks.
Data collection and preprocessing
n any deep learning task data is the most important component. It drives the overall process. If the data collected is not good then the whole deep learning architecture will fail. It is important that the source of the data is legitimate. This reduces the effort to clean the data during preprocessing.
Once the data is collected, preprocessing plays an important role. This process takes a lot of time in any deep learning tasks. If the data is not collected from the legit source then it is vital to clean such that the deep learning models can perform well in the desired task.
Also, it is a good practice to make the data as diverse as possible, this usually means you’ll need a lot of training data.
Word embeddings
In any NLP tasks it is highly recommended to use word embeddings. It has been shown that using word embedding enhances the model performance in any given task.
Model depth
Model depth is important to learn complex data. As we present more data, variance increases which makes the data more complex to model. So in order to learn complex structures we need complex models but sometimes more complexity can lead to overfitting. So it is important to have the right model depth that models the data in a way that can yield good results.
But it is also worth noting that unlike computer vision tasks, NLP tasks do not often require deeper models. In a paper released by Reimer and Gurevych where they performed experiments stating that a depth of 2-4 is usually sufficient to train a language model.
Optimization
Every model needs to be updated during training so that they can perform well during the inference. This process is usually known as ‘backpropagation’ or ‘optimization’. Optimizations can be very tricky, for instance if we change the value of beta in the Adam optimizer the performance of the model can drastically change. So it is recommended to keep an eye on the optimizer that is being used along with the parameters that accompany the selected optimizer.
Also, if you are implementing a model that has a published literature for it, then consider checking the parameters used in the original experiment.
Note: Adam optimizer is one of the popular optimizers that is being used widely in both NLP and computer vision, followed by Stochastic Gradient Descent.
Hyperparameter tuning
Hyperparameter tuning is considered to be one of the most important steps in any deep learning project. It basically allows you to navigate over various configurations to build a good deep learning model. Hyperparameter tuning or fine-tuning refers to things like:
- Number of layers
- Layer depth
- Batch size
- No of epochs for training
- Optimizer and its parameter
- Also sometimes tweaking with the data as well
It is very time consuming to train the model for every possible configuration. So one of the best things that you can do is “parallel training”. For parallel training you can first create different modules for each component like separating data loading and preparation with model preparation. Secondly, make a different module where you train the model by importing different modules. This step can be replicated n number of times with different configurations which will help you to not only to save time but also get a best model with ease.
Inference
Once the training and validation is done and the model’s performance is up to the desired standards, then it is time for inference or testing. Inference helps us to understand how a model will perform on the unseen data.Make sure that you have kept aside raw data and have not processed it with the training and the validation. If you separate the data for training, testing and validation after preprocessing it then there is a chance of data leakage where the model performs well in all the three dataset but when deployed in the real it might fail.
Final Thoughts
I hope that this post was helpful in putting forward what the Seq2Seq model is. We covered the basic Seq2Seq model followed by the attention Seq2Seq model. We also covered the working of both models in pytorch, Keras and tensorflow. The explanations of all the steps are given so that the reader can learn and practice the code on the go.
The aim of this post was to bring as much information as possible to create a continuous flow of learning and practicing. I hope that this post will allow you to gain a deeper perspective and intuition on how the Seq2Seq model works.
Credits for codes
The codes that are mentioned in this post are inspired by a few of the authors. I have just made it simple for understanding purpose and readability.
Authors of the code:
- Devesh: Language translation with Seq2Seq with Keras
- fojoshi : Language translation with attention Seq2Seq with Tensorflow
- Tae-Hwan Jung (graykode): Seq2Seq with Pytorch
All the codes are executable, you can either copy and paste it in your notebook or you can access them from this link here.
We’ve introduced cnvrg.io Metacloud, a managed AI platform that offers the ability to bring your own compute and storage, with native integrations to major cloud providers and leading OEMs. Metacloud removes the operational complexity and lower-level configuration details of creating your AI pipelines. Simply sign up, and start building high-impact models in minutes!
We’re offering Metacloud initially as a preview release. Learn more about Metacloud, and sign up now to request early access.
For more information
- Sequence to Sequence Learning with Neural Networks
- Neural Machine Translation by Jointly Learning to Align and Translate
- Sebastian Ruder: Deep Learning for NLP Best Practices
- Recurrent Neural Network Guide – a Deep Dive in RNN
- Attention — Seq2Seq Models
- Visualizing A Neural Machine Translation Model (Mechanics of Seq2Seq Models With Attention)
- A Simple Introduction to Sequence to Sequence Models
- Optimal Hyperparameters for Deep LSTM-Networks for Sequence Labeling Tasks
- Seq2Seq with attention (machine translation with deep learning)