Introducing cnvrg.io AI Blueprints
AI Blueprints are pre-assembled Machine Learning (ML) pipelines for a variety of business use cases. With AI Blueprints, software developers are now first-class citizens in machine learning. They are pre-packaged, no-code/low-code MLOps solutions that aim to democratize ML for business users, marketers, software developers & data scientists alike. This developer guide will give a step by step explanation on how to create your own AI Blueprint that can be used to improve your business with easy to implement AI.
cnvrg.io AI Blueprints were built to democratize data science and fill in the gap between low code and high code machine learning solutions. By providing an AI service-based ecosystem, AI Blueprints enable developers with little to no AI knowledge to easily accomplish their tasks using AI in a straightforward and efficient manner.
One doesn’t have to be an expert in machine learning to gain value from AI Blueprints. cnvrg.io data science and ML engineering experts have done all of the work for you. You even don’t have to wait for IT to provision clusters and resources — just a few clicks and you’re all set for running on premises or on popular clouds. Some features of AI blueprints include:
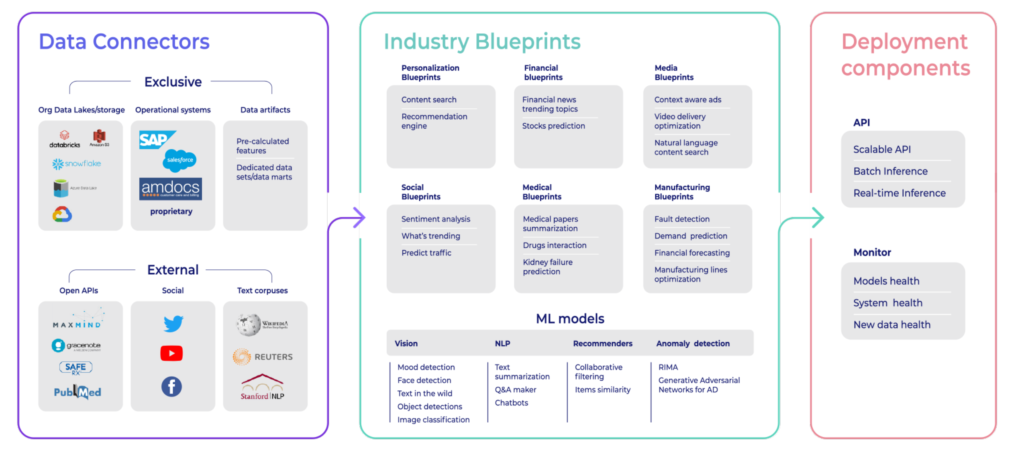
- Ready-made connectors for working with common data sources in the cloud and on-premises. Just choose the Blueprint you need and the data source that you want, and gain value in minutes.
- Ability to customize a Blueprint for your specific needs through cnvrg.io Metacloud MLOps platform. Metacloud provides a platform where your whole team can easily collaborate to train and deploy customised AI Blueprints at scale, even changing hardware and deployment patterns with cloud-native ease.
- Use data from your own storage such as S3 bucket and Azure blob storage, or from your business Twitter account, Wikipedia or Salesforce.
- AI blueprints can be used by Developers, Data Scientists, ML Engineers and even business users.
For a list of the cnvrg.io marketplace of AI Blueprints that can be leveraged for existing tasks click here.
AI Blueprints are made using Docker (Containerization), Grafana/Kibana (for dashboarding), Kubernetes (Container Orchestration System) & use Intel Devcloud for cloud services and compute resources. You can find more information about the building blocks here.
How to use AI Blueprints?
AI Blueprints are really easy to use. For starters, sign up for early access to get a sense of navigating within the environment, before you sign up for the professional tier, here.


Once you have access to your dedicated environment, click on the Blueprints button and be-redirected to the AI Blueprints marketplace page.
In this blog we will take a look at the pose detection blueprint as an example. Type “Pose” in the search bar and select the “Pose Detection Inference”.

The text below the title “What’s in it for you” reads :
Immediately detect and identify poses and activity types in images and the surrounding box of the detected objects in the image.
Meaning you can upload images of humans and the algorithm will identify the pose they are in for you in just one click.
For example using this image:

The output is a Json String as seen below:

					JSON OUTPUT
{
  "prediction": [
    {
      "bbox": [
        310,
        198,
        336,
        249
      ],
      "class": "tree",
      "conf_score": 0.724
      "file": "img.jpeg",
      "score_pose": 0.5747
    }
  ]
}
Let’s interpret the output, it consists of 4 separate keys, under 1 key (prediction).
bbox : “bounding box” of the rectangle drawn around the human
class : “tree” basically the yoga pose that the person is in right now
conf_score: confidence of the bounding box
file : name of the file that was fed into the endpoint
score_pose : confidence with which the model can classify the pose into one of the predefined categories
That was Easy! But it was just the endpoint of the blueprint. You can also create bigger blueprints in which you can utilize multiple libraries to generate output.
Let’s use “Pose Detection” again, this time for training rather than inference.
Go back to the Blueprints page and type “Pose Detection Train” and then select the blueprint.

Click on Use Blueprint and you’ll be redirected to the following page:

Here, you can see various libraries (those rectangles are called libraries) inter-connected with each other. The purpose of the inter-connection is to send data from the earlier library (in the pipeline) to the later one. The combination of these libraries is called a blueprint. We can create a new one by simply replacing/adding/removing a library.
Let’s replace the “S3-Connector” with a new library called “Google Cloud Connector” and fashion a new blueprint. Type “Google” in the top right area and select the first pop up option.

Now, connect the little rectangle called “Google-cloud-connector” with the “train test split” library and your new blueprint is ready!
This blueprint will source the training images from the Google Cloud connector instead of the S3-connector. Although you can re-publish this modified blueprint as a new one, that’s beyond the scope of this blog. However, in order to learn how to create a new blueprint, click here on part 2 of this blog.
Thank you for reading.