A step-by-step guide including a Notebook, code and examples
AI and Deep Learning (DL) have made a lot of technological advances over the last few years. The industry itself has grown rapidly, and has been proven to transform enterprises and daily life. There are many deep learning accelerators that have been built to make training more efficient. Today you’ll learn how to accelerate deep learning training using PyTorch with CUDA.
Why use GPU over CPU for Deep Learning?
There are two basic neural network training approaches. We might train either on a central processing unit (CPU) or graphics processing unit (GPU).
As you might know, the most computationally demanding piece in a neural network is multiple matrix multiplications. In general, if we start training on a CPU, each operation will be done one after the other. On the contrary, when using a GPU, all the operations will be done at the same time.
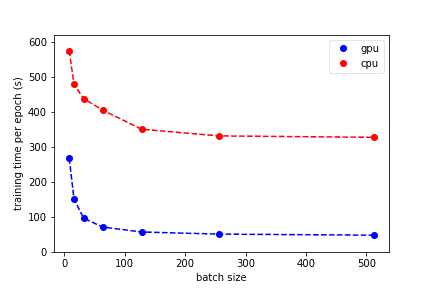
This is the main advantage of GPU over CPU. It is way faster. So, if you want to train a neural network please use GPU as it will spare you a lot of time and nerves.
How to maximize your GPUs using CUDA with PyTorch
This article is dedicated to using CUDA with PyTorch. I will try to provide a step-by-step comprehensive guide with some simple but valuable examples that will help you to tune in to the topic and start using your GPU at its full potential.
In this article we will talk about:
- What is PyTorch?
- Deep learning frameworks, Tensorflow, Keras, PyTorch, MxNet
- PyTorch CUDA Support
- CUDA, tensors, parallelization, asynchronous operations, synchronous operations, streams
- Using CUDA with Pytorch
- Availability and additional information about CUDA, working with multiple CUDA devices, training a PyTorch model on a GPU, parallelizing the training process, running a PyTorch model on GPU
- Best tools to manage PyTorch models
- Tensorboard, cnvrg.io, Azure Machine Learning
- Best practices, tips, and strategies
Let’s jump in.
What is PyTorch, and what makes it so popular?
To start with, let’s talk about deep learning frameworks. As you might know, there are many DL frameworks out there:
- TensorFlow (TF)
- Keras
- PyTorch
- MxNet
- And others
Each of these frameworks offers users the building blocks for designing, training, and validating deep neural networks through a high-level programming interface.
Every data scientist has their own favorite Deep Learning framework. PyTorch has become a very popular framework, and for good reason.
PyTorch is a Python open-source DL framework that has two key features. Firstly, it is really good at tensor computation that can be accelerated using GPUs. Secondly, PyTorch allows you to build deep neural networks on a tape-based autograd system and has a dynamic computation graph.
Moreover, PyTorch is a well-known, tested, and popular deep learning framework among data scientists. It is commonly used both in Kaggle competitions and by various data science teams across the globe.
To install PyTorch simply use a pip command or refer to the official installation documentation:
pip install torch torchvision
It is worth mentioning that PyTorch is probably one of the easiest DL frameworks to get started with and master. It provides awesome documentation that is well structured and full of valuable tutorials and simple examples. You should definitely check it out if you are interested in using PyTorch, or you are just getting started.
Furthermore, PyTorch includes an easy-to-use API that supports Python, C++, and Java. Also, PyTorch has no problems integrating with the Python data science stack which will help you unveil its true potential.
Overall, PyTorch is a really convenient to use tool with limitless potential. If you haven’t used it yet, you must try. I guarantee, it is worth it. Still, in this article the focus is on PyTorch and CUDA’s interaction, so, let’s proceed with a deep dive.
PyTorch CUDA Support
CUDA is a parallel computing platform and programming model developed by Nvidia that focuses on general computing on GPUs. CUDA speeds up various computations helping developers unlock the GPUs full potential.
CUDA is a really useful tool for data scientists. It is used to perform computationally intense operations, for example, matrix multiplications way faster by parallelizing tasks across GPU cores.
However, it is worth mentioning that CUDA is not the only tool for GPU computation acceleration. There is also OpenCL by Nvidia as well. Still, CUDA is simply more popular due to its high-level structure, so if you are not sure which tool to use you should probably start with CUDA.
As for PyTorch, it natively supports CUDA. CUDA can be accessed in the torch.cuda library.
As you might know neural networks work with tensors. Tensor is a multi-dimensional matrix containing elements of a single data type. In general, torch.cuda adds support for CUDA tensor types that implement the same function as CPU tensors but they utilize GPUs for computation. If you want to find you more about tensor types please refer to torch.Tensor documentation
Considering the key capabilities that PyTorch’s CUDA library brings, there are three topics that we need to discuss:
- Tensors
- Parallelization
- Streams
Tensors
As mentioned above, CUDA brings its own tensor types with it. The key feature is that the CUDA library is keeping track of which device GPU you are using.
CUDA automatically assigns any tensors that you create to the device that you are using (in most cases this device is GPUs). Moreover, after your tensor is assigned to a particular device you can perform any operation with it. These operations will be run on the device and the result will be assigned to the device as well.
This approach is really convenient as you may perform many operations at the same time by simply switching CUDA devices. Moreover, CUDA does not support cross-device computations. It means you will not mix and lose track of experiments due to any mistake if you spread your operations on different devices.
Parallelization
CUDA’s parallelization concept is based on asynchronous operations as all GPU operations are asynchronous by default. Such an approach helps to perform a larger number of computations in parallel.
For the user, this process is almost invisible. PyTorch does everything automatically by copying data required for computation to various devices and synchronizing them. Moreover, all operations are performed in the order of queuing as if every operation was executed synchronously.
Still, there is a major disadvantage. For example, if you face an error on a GPU it might be a tough challenge to identify the operation that caused the error. In such a case, it is better for you to use the synchronous approach. CUDA allows this as well.
By using synchronous execution you will see the errors when they occur and be able to identify and fix them. To use synchronous execution please refer to the official documentation considering this problem.
Streams
CUDA stream is a linear sequence of execution that is assigned to a specific device. In general, every device has its own default stream so you do not need to create a new one.
Operations are serialized in the order of creation inside each stream. However, operations from different streams can be executed at the same time in any relative order unless you are using any special synchronization methods.
It is worth mentioning that PyTorch automatically synchronizes data if you have your default stream set to some new stream. Still, it does not work with non-default streams. In such a case, it is your responsibility to ensure proper synchronization.
Using CUDA with PyTorch: a step-by-step example
Now you understand the basics of PyTorch, CUDA and their key capabilities. You also understand PyTorch CUDA support. Now let’s step away from the theory and discuss more practical applications of PyTorch and CUDA.. This section will cover how to use CUDA with PyTorch. I will try to be as precise as possible and try to cover every aspect you might need when working on your ML project.
What will be covered in this section:
- How to check the availability of CUDA?
- How to get additional information about the CUDA device?
- How to work on multiple CUDA devices?
- How to train a PyTorch model on a GPU?
- How to parallelize the training process?
- How to run a PyTorch model on a GPU?
Also, I have prepared a notebook that can be accessed via Google Collab to support this article. In this notebook, I am using MobileNet V3 architecture to solve a classification problem on the CIFAR10 dataset.
You will find everything mentioned in this article below in the notebook. Do not forget to turn on the GPU as the notebook will crash without it. Please feel free to experiment and play around as there is no better way to master something than practice.
Let’s jump in.
Check availability of CUDA
To start with, you must check if your system supports CUDA. You can do that by using a simple command.
torch.cuda.is_available() This command will return you a bool value either True or False. So, if you get True then everything is okay and you can proceed, if you get False it means that something is wrong and your system does not support CUDA. Please make sure that you have your GPU turned on (in case you are using Google Collab) or go to the web to find out any other internal issues.
It is a crucial moment as this command will check if your GPU is available and the required NVIDIA drivers and CUDA libraries are properly installed. Please do not ignore this step as it might save you a lot of time and unnecessary frustrations.
Additional information about CUDA device
If you passed the previous step, it is time to figure out some useful information about the CUDA device you are currently on. The methods mentioned below are quite useful, so please keep them in mind when working with CUDA as they might help you figure out the problem if something goes wrong.It is worth mentioning, that the methods are available only on GPUs as that is exactly what CUDA works with.
Let’s start with simple information about the CUDA device like an id and name. There are simple methods for finding both of them.
torch.cuda.current_device() #returns you the ID of your current device
	torch.cuda.get_device_name(ID of the device) #returns you the name of the device
Also, you may find some useful information about the memory usage of the device.
torch.cuda.memory_allocated(ID of the device) #returns you the current GPU memory usage by tensors in bytes for a given device
	torch.cuda.memory_reserved(ID of the device) #returns you the current GPU memory managed by caching allocator in bytes for a given device, in previous PyTorch versions the command was torch.cuda.memory_cached
Moreover, you can actually release all unoccupied cached memory currently held by the caching allocator so that those can be used in other GPU applications using a simple method.
torch.cuda.empty_cache() Still, you must remember that this command will not free the occupied GPU memory, so the amount of GPU memory available for PyTorch will not be increased. Just keep this in mind.
Working with multiple CUDA devices
All right, let’s assume that you have multiple devices that are CUDA compatible. Of course, you can use only one of them but, if you have the ability, you should probably use all of them. Firstly, using all of them will increase performance.. Secondly, CUDA allows you to do it quite seamlessly.
In general, there are two basic concepts that you might want to follow if you want to maximize the potential of multiple GPUs:
- Simply use each GPU (device) for its own purpose (task or application) – the basic but quite effective concept
- Use each GPU to do a part of a project – for example, in the ensemble case where you need to train a variety of models
Overall, the workflow is quite simple. Firstly, you need to figure out the ID of a specific CUDA device that you have using the methods mentioned above. Secondly, you just need to allocate tensors to a specific device or change the default device.
If you’re considering allocating tensors to various code devices, please keep in mind that in general, all tensors are allocated to your default (current) device that has ID equal to zero (0). Still, you can easily allocate a tensor to any CUDA device if you specify the ID of a destination device.
cuda1 = torch.device(‘cuda:1’) #where 1 is the ID of specific device
	tensor = torch.Tensor([0.,0.], device = cuda1)
	tensor = torch.Tensor([0.,0.]).to(cuda1)
tensor = torch.Tensor([0.,0.]).cuda(cuda1)
As you may see there are three ways to allocate a PyTorch tensor to a specific device. Feel free to use any of them as all of them are legit. As mentioned above you cannot perform cross-GPU operations, so please use tensors from one device. Also, be aware that the tensor’s operation result will be allocated at the same device as the tensors.
Moving on to changing the default CUDA device. You can easily do this with a simple method.
torch.cuda.set_device(1) #where 1 is the ID of device By doing that you will switch the default CUDA device and from that point, every tensor will be allocated on a new device.
Also, if you have multiple GPUs and for some reason do not want to use some of them you can make a specific GPU invisible using an environment variable.
import os
	os.environ[“CUDA_VISIBLE_DEVICES”] = “1,2,3” #where 1, 2, 3 are the IDs of CUDA devices that will be visible (in this example device with the 0 ID is invisible)
Training a PyTorch model on a GPU
Now that you know how to work with tensors and CUDA devices (GPUs), it is finally time to talk about training a PyTorch neural network on GPU. To tell the truth, it’s actually not so difficult. If you have checked the availability of the CUDA device, you will not face any problem in this step.
You might want to reference the “MobileNetV3 (small)” and “Training preparation” sections of the notebook I have prepared for you as it covers pretty much everything you need to know.
So, to train a PyTorch model on a GPU you need to:
- Code your own neural network architecture or use a pre-built one from torchvision.models
- Allocate your model to the GPU
net = MobileNetV3() #net is a variable containing our model
net = net.cuda() #we allocate our model to GPU
3. Start training
Yes, it is that simple. Fortunately, PyTorch does not require anything complicated to carry out this task, unlike some other frameworks.
From now on your model will store on the GPU and the training process will be executed there as well. However, please do not forget that you must allocate your data on the GPU as well or you will face errors. You can do that as described in the “Working with multiple CUDA devices section”.
Still, if you want to make sure that your model is truly on the GPU you must check whether its parameters are on GPU or not.
next(net.parameters()).is_cuda #returns a bool value, True - your model is truly on GPU, False - it is not
If you are interested in the general training process for PyTorch models please refer to the “Training” section of my notebook as I have manually coded the training process there.
Parallelizing the training process
As for the parallelization, in PyTorch, it can be easily applied to your model using torch.nn.DataParallel.
The general idea is splitting the input across the specified CUDA devices by dividing the batch into several parts. In the forward pass, the model is replicated on each device, and each replica handles a portion of the input. During the backwards pass, gradients from each replica are summed into the original model.
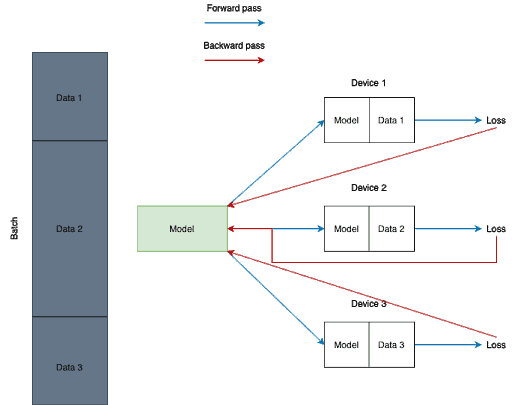
Still, in terms of code, it is very simple. Below you can find a piece of code where I form a list of GPUs to make them CUDA visible devices, allocate my model to GPU and use DataParallel to make my training process parallelized.
GPU = 0, 1
gpu_list = ''
multi_gpus = False
if isinstance(GPU, int):
   gpu_list = str(GPU)
else:
   multi_gpus = True
   for i, gpu_id in enumerate(GPU):
       gpu_list += str(gpu_id)
       if i != len(GPU) - 1:
           gpu_list += ','
os.environ['CUDA_VISIBLE_DEVICES'] = gpu_list

net = net.cuda()
if multi_gpus:
   net = DataParallel(net, device_ids = gpu_list)
Running a PyTorch model on GPU
So, after you finished training you might want to test your model on some test dataset. That is the point where you need to figure out how to run your model on a GPU.
Luckily we already know everything we need to do that. You can find a simple example of loading a PyTorch model from the checkpoint and allocating it to a CUDA device.
	cuda = torch.cuda.is_available()
	net = MobileNetV3()
	checkpoint = torch.load(‘path/to/checkpoint/)
	net.load_state_dict(checkpoint[‘net_state_dict’])
	if cuda:
		net = net.cuda()
	net.eval()
	result = net(image) #remember that image must be allocated to GPU as well
Best tools to manage PyTorch models
In the previous section, we have discussed how to use CUDA with PyTorch and now you should not face obstacles when using CUDA for your PyTorch project. Still, it is considered common sense to have a specific tool to back you up.
Sometimes when you dive into a project, you may quickly realize that you’re drowning in an ocean of Python scripts, data, algorithms, functions, updates, and so on. At some point, you just lose track of your experiments, and can’t even say which script or update led to the best result. That is why it is very convenient to have a tool that will help you with experiment tracking and model management.
There are many MLOps tools. There are even articles and lists that cover this topic. Still, I want to mention some of them here so you are able to feel the variety and decide if you need a tool at all.
I am sure you are all familiar with the first tool. It is Tensorboard.
In my experience it is the most popular tracking and visualization tool out there. It can be used with PyTorch but it has some pitfalls. For sure, it is an easy-to-start tool but its tracking functionality seems limited. There are tools that provide way more capabilities.
Still, it has nice and complete documentation, so you might give it a shot.
One way to make Tensorboard even easier to use is with cnvrg.io. cnvrg.io has Tensorboard embedded into the platform to help track and manage your projects without having to switch between platforms. In addition, cnvrg.io is natively integrated to PyTorch, that allows data scientists to easily parallelize computations across nodes. Not only that but cnvrg.io is natively integrated with Nvidia’s NGC containers so data scientists can instantly launch PyTorch in one click with optimized performance.
Overall, it is a very powerful tool with awesome and easy to navigate through documentation. Moreover, it has valuable tutorials for using PyTorch, so you should have no problem setting things up. Please refer to the official documentation if you want to learn more about the platform as there is too much to talk about.
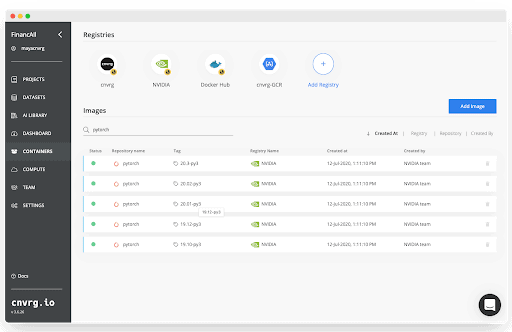
That is why cnvrg is a good fit as the project management tool for any DL project.
The third tool I want to mention here is Azure Machine Learning. It is a cloud-based machine learning lifecycle platform developed by Microsoft.
To tell the truth, it is a really popular tool that is used by some large IT companies. It is really good at versioning and experiment tracking and has well-structured documentation with loads of simple examples.
However, due to its end-to-end focus and lack of valuable advanced tutorials the entry threshold is rather high. You really need to learn the tool before you will use it effectively. That is why please use Azure Machine Learning only if you are ready to spend some time studying the instrument.
Of course, it is impossible to cover all the variety of different MLOps tools. I have mentioned only those that I frequently use myself. So, please feel free to investigate the topic and you will eventually find the tool that suits you and your project the best
Best practices, tips, and strategies
Throughout this article I mentioned plenty of useful tips and techniques, so let’s summarize them into a list:
- Pick PyTorch as a DL framework if you want a tool that is effective, fast, and convenient to use
- Always train on GPUs
- If you are working in Kaggle kernels or Google Collab do not forget they support GPU usage but they are turned off by default. Please enable GPU accelerators there
- It is super easy and effective to use CUDA when working with a PyTorch model
- Do not forget about CUDA key capabilities such as tensors creation and usage, parallelizations, and streams
- Remember that it’s always good practice to keep track of GPU memory usage when using CUDA as it will help you avoid some unfortunate mistakes
- Do not forget to check PyTorch’s official documentation as it has plenty of simple examples and valuable tutorials that must cover the majority of your questions
- It’s recommended to use more than one GPU for better performance (if you have the option)
- Do not forget to parallelize the training process if possible
- Do not underestimate the power of community and forums. In many cases, if you face an error you can simply Google it and find the answer
- It is always better to use some MLOps tool to help you with model management, experiment tracking, resource management and DevOps automation
- You must keep an eye on PyTorch and CUDA updates as some things might change
Final Thoughts
Hopefully this tutorial will help you succeed and use your GPUs more effectively in your next Deep Learning project.
To summarize, we started with some theoretical information about using PyTorch and CUDA and went through a step-by-step guide on how to use CUDA when working on a PyTorch model. Also, we covered some PyTorch model management tools. Lastly, we talked about some tips you may find useful when working with CUDA.
If you enjoyed this post, a great next step would be to start building your own Deep Learning project with all the relevant tools. Check out tools like:
- PyTorch as a DL framework,
- CUDA as GPU accelerator,
- cnvrg for model management and experiment tracking
For extra support, you can access the Notebook for further code and documentation.
Thanks for reading, and happy training!
Resources
- https://www.analyticsvidhya.com/blog/2017/05/gpus-necessary-for-deep-learning/
- https://pytorch.org
- https://developer.nvidia.com/cuda-zone
- https://pytorch.org/docs/stable/cuda.html
- https://cnvrg.io
- https://www.tensorflow.org/tensorboard?hl=en
- https://azure.microsoft.com/en-us/services/machine-learning/