Continual learning is the ability of a model to learn continually from a stream of data. In practice, this means supporting the ability of a model to autonomously learn and adapt in production as new data comes in. Continual learning is used in machine learning to improve model accuracy and strengthen model performance. If you haven’t already done so, you can learn more about continual learning in our in depth post about how to apply continual learning to your machine learning models. In this post we will use MNIST as an example of how you train, deploy and automate the process of machine learning in production.
Solving an MNIST problem
MNIST is the most popular example for deep learning. It is an OCR application with a primary goal of identifying numbers from handwritten text. The database contains 60,000 training images and 10,000 testing images. It is a good database for people who want to try learning techniques and pattern recognition methods on real-world data while spending minimal efforts on preprocessing and formatting.
For a minute, let’s imagine the problem we are trying to solve as a financial business. In a recent survey, customers have expressed the need to easily deposit checks using the app. The company has decided to build a feature that will recognize a check from the phone camera, and instantly deposit the check to your account. Since our user base in the platform is growing, we want to recognize more handwritten styles and different digits written by different users. This will make our service more user friendly and result in more check deposits. We want our model to gain really high performing accuracy and maintain great models by continually retraining our model as new users join.
Code review
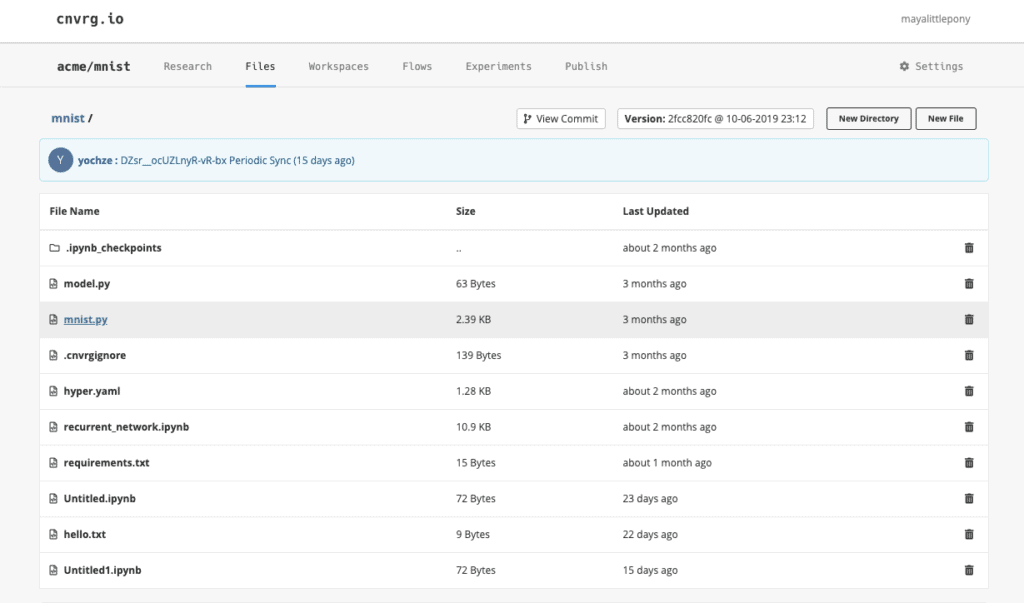
First, you’ll go over to the code. As you can see we have the MNIST algorithm already uploaded under files. It’s simply using a ConvNet, from the Keras example. At this stage, we are also able to debug the code using Jupyter Notebooks, but for this example we will not go into that.
Building an MNIST training pipeline
We’ll begin by using the flows feature in cnvrg.io. Flows will allow us to build a production ready machine learning pipeline with easy drag and drop functionality.
Step 1: Add Dataset
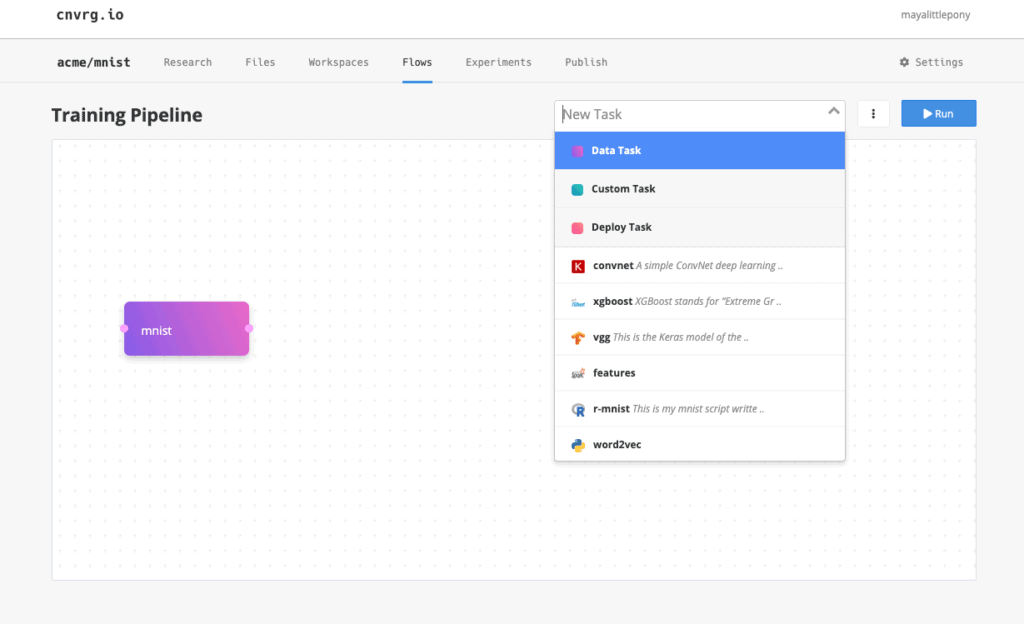
First I’ll need to choose the MNIST data set. As explained before, the data set is a bunch of images of handwritten digits. Under New Task, I’ll choose “Data Task” and type MNIST into the pop-up where indicated. We’ve already uploaded the data set to cnvrg.io prior to building the pipeline.
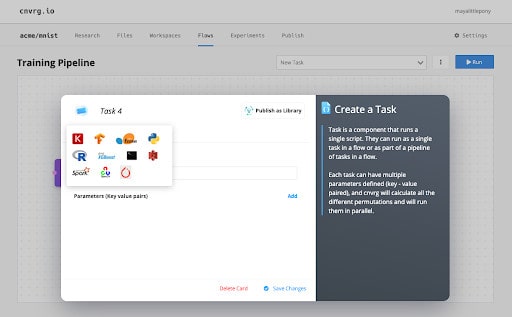
Step 2: Add Algorithms
Next I’ll add one of the models in cnvrg.io’s AI registry. Since we’ve already written the code beforehand, we’ll use ConvNet which is the code from earlier. On the right side I can see the documentation of this algorithm and the different parameters.
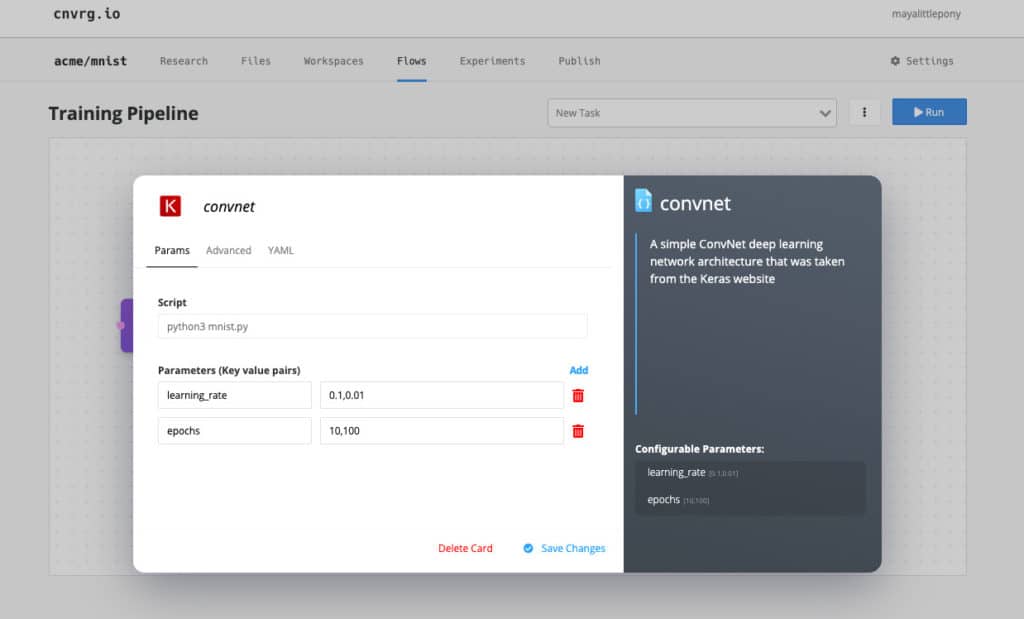
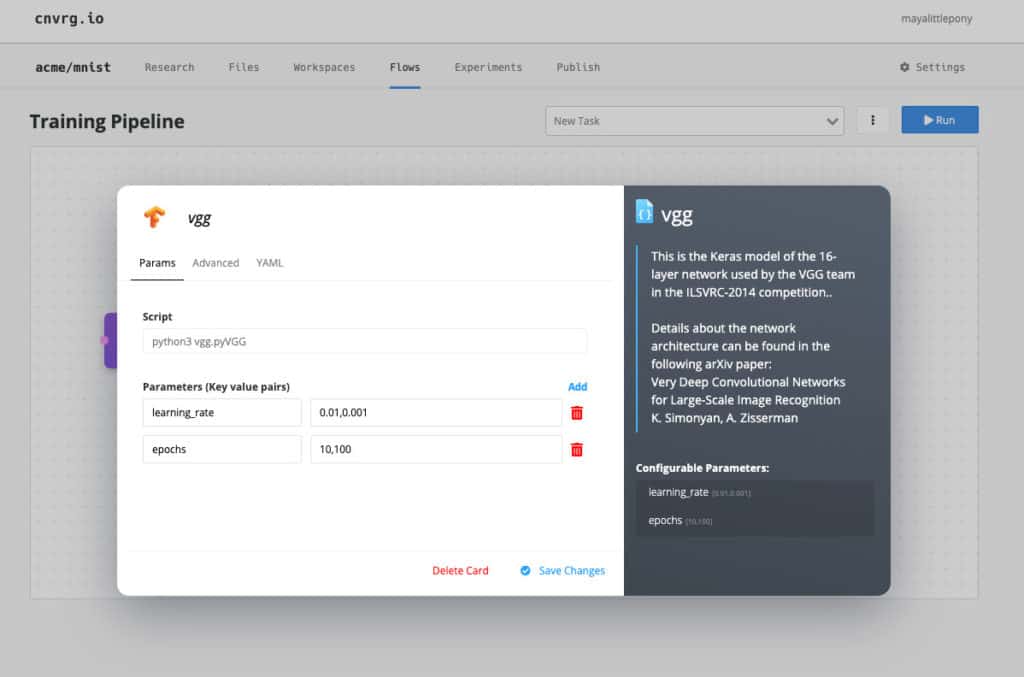
As we said before, AutoML plays a large role in applying continual learning. Here, we have comma-separated values, which means that cnvrg.io will test all the possible permutations and make sure that I have the best model for the production environment. We’ll also add VGG as well, this is a pre-built neural network for large-scale image recognition.
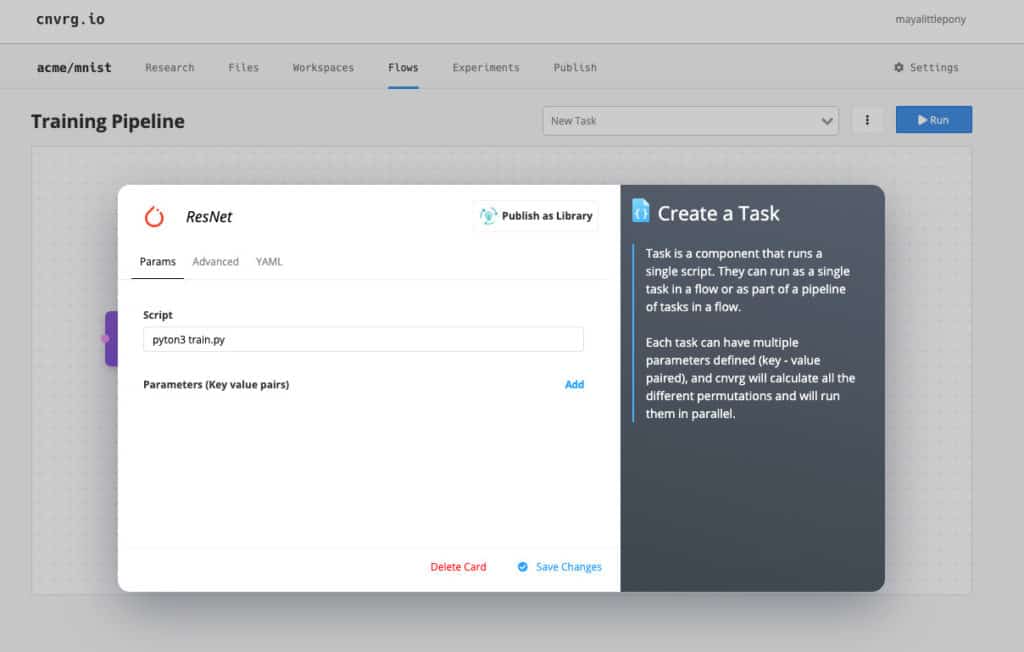
I’ll also create my own custom task from PyTorch.
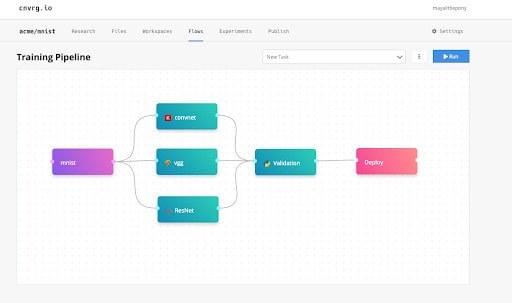
Step 3: Connect data to tasks
Flows visual interface allows you to connect the dots from the data to the tasks added.

After I design the first part of the pipeline, it is all set up to automatically train my models using open source, Keras, TensorFlow and PyTorch.
Step 4: Add Validation
Next I will add another custom task for validation using a script that I built. The script takes the models and runs some tests on top of them. The script will test accuracy, size of the network – such as the complexity of the computation – as well as performance speed. In production, this will be the first round of tests – just like software tests – to the model before deployment.

Step 5: Add experiment deployment
Using the deployment button, I will deploy the model to a Kubernetes cluster. By simply adding the deployment component, it will tell the pipeline to deploy once completed – no configuration required.
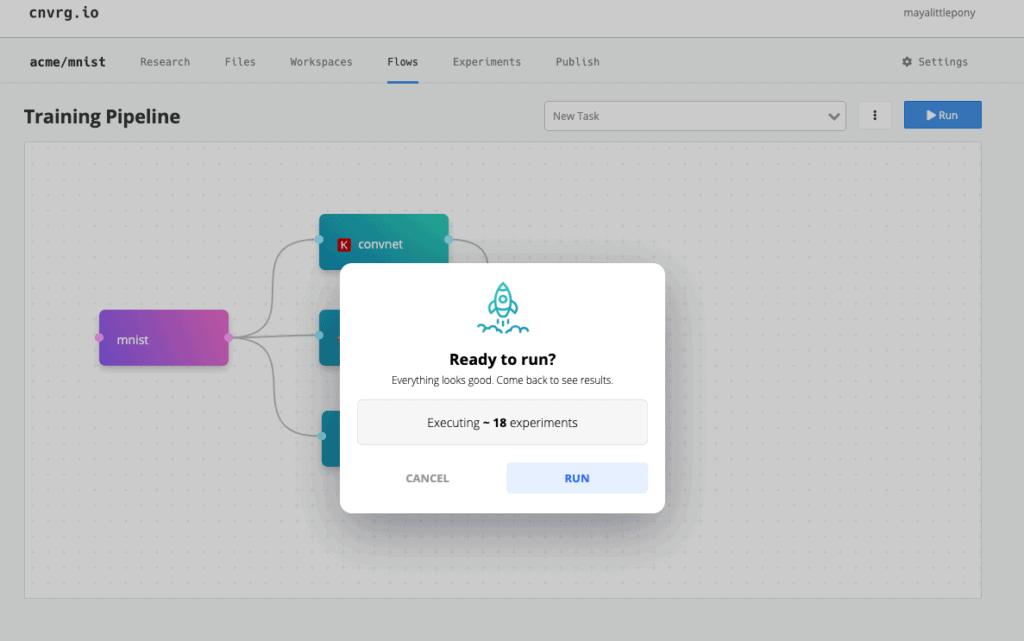
Once I click run, cnvrg.io will calculate how many experiments it will run. In this case, I’m running only 18 experiments, so, it’s going to do AutoML on the 18 experiments.
Tracking & monitoring experiments
In the “Experiments” tab, I have a list of all the experiments that my AutoML ran. Here, I can see exactly what has been happening in my model, the VGG, the ConvNet. I can track all the metrics and all the hyperparameters. I can add any parameter to my table by clicking the table dropdown and selecting any parameter I’d like to track.
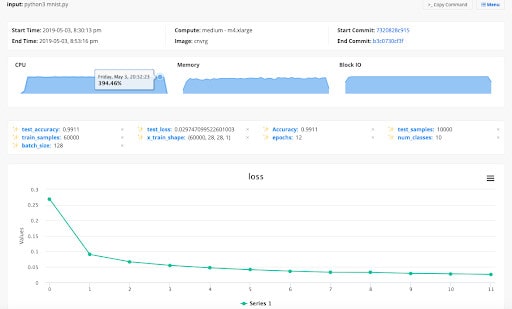
You will also monitor experiments individually. In cnvrg.io every experiment gets its own dashboard that I can track live. The dashboard gives live visuals of things like resource usage, metadata, hyperparameters and metrics, and you can see loss.
As explained earlier, it’s not only useful to know what kind of model is being deployed in production, it’s also useful to know afterwards. As a data scientist, the research job is not over once my model is in production. It’s important for the next time I research this problem to be able to see prior information and see if I can improve the algorithm. By tracking it here, you can safely see all the experiments and compare experiments by selecting the experiments you want to observe and click “compare” under “Actions”. All the models that I built are tracked, and I can choose the best one to deploy to production.
Deploy your best model to production with continual learning
Once you’ve chosen the best performing model from your experiments, it’s time to deploy to production. cnvrg.io deploys models automatically using Kubernetes alongside Istio, Prometheus, and the AlertManager in the back-end. Every model can be deployed in one click. To do so, you just need to choose a file and function, and all the models are being deployed are monitored. So, the data scientist can see the exact status of the predictions. You’ll also get a URL that you can share with your colleagues, and see all the input and output of the models, download it as a CSV and retrain your models on the new data.
Unique to any other data science platform, cnvrg.io has a specific tab for continual learning. The goal of continual learning in our case is to provide transparency and control to the data scientist. They can add rules to monitor input data to track if you receive any unexpected values with some sort of sensitivity, which will trigger an email to the data scientist. In addition, you can also monitor the prediction themselves, so we can see that if the model confidence is below 0.5, then retrain the model using the machine learning pipeline that we built earlier. This is really just closing the loop, providing an end-to-end solution for the continual learning pipeline. The data scientist will be alerted when there is bad input, when there is data that is not correlated to the trainer test data.
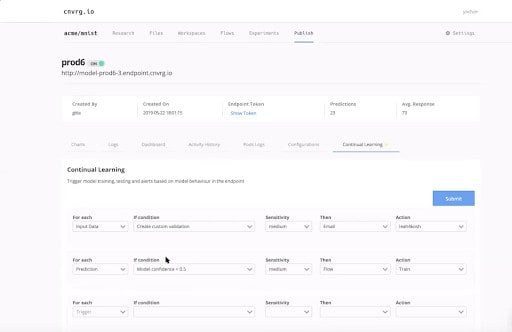
I can also use my own custom validations, I can add other rules and make it really easy for my data scientist and data engineers to manage the machine learning pipeline. You can trigger flow on data set updates so that whenever there is a new version of this data set, it will automatically rerun the training pipeline. You can also do the same with scheduling. Just retrain this model once a week, whenever there is a specific date and time.
No matter how you decide to apply continual learning, the purpose is to improve model accuracy and strengthen model performance. Once your model is in production in your financial application, you’re model will only improve over time. With each user, new data will spark training in real time and strengthen your models performance.
You can download the webinar on demand here.